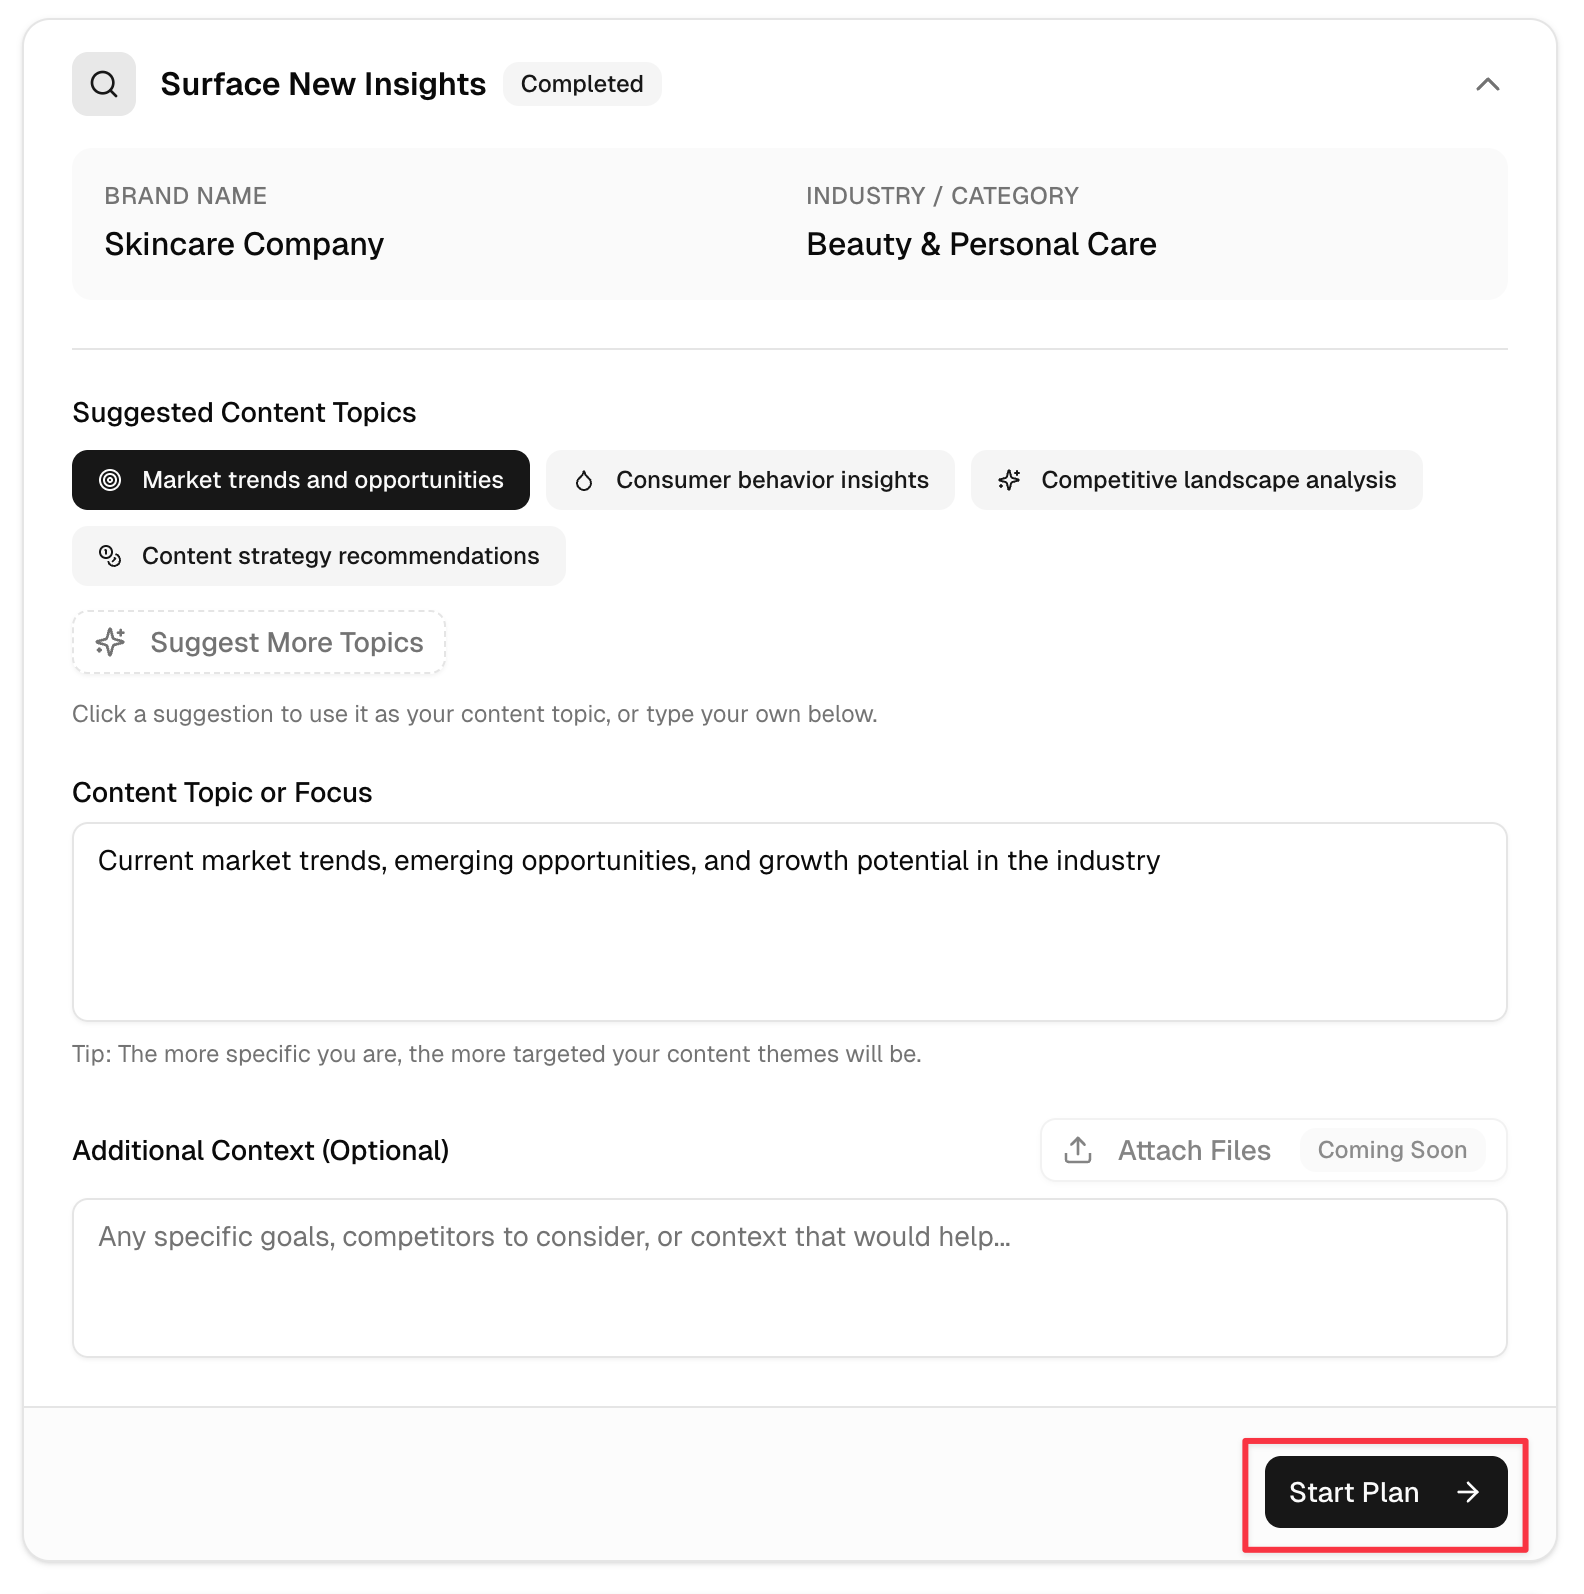
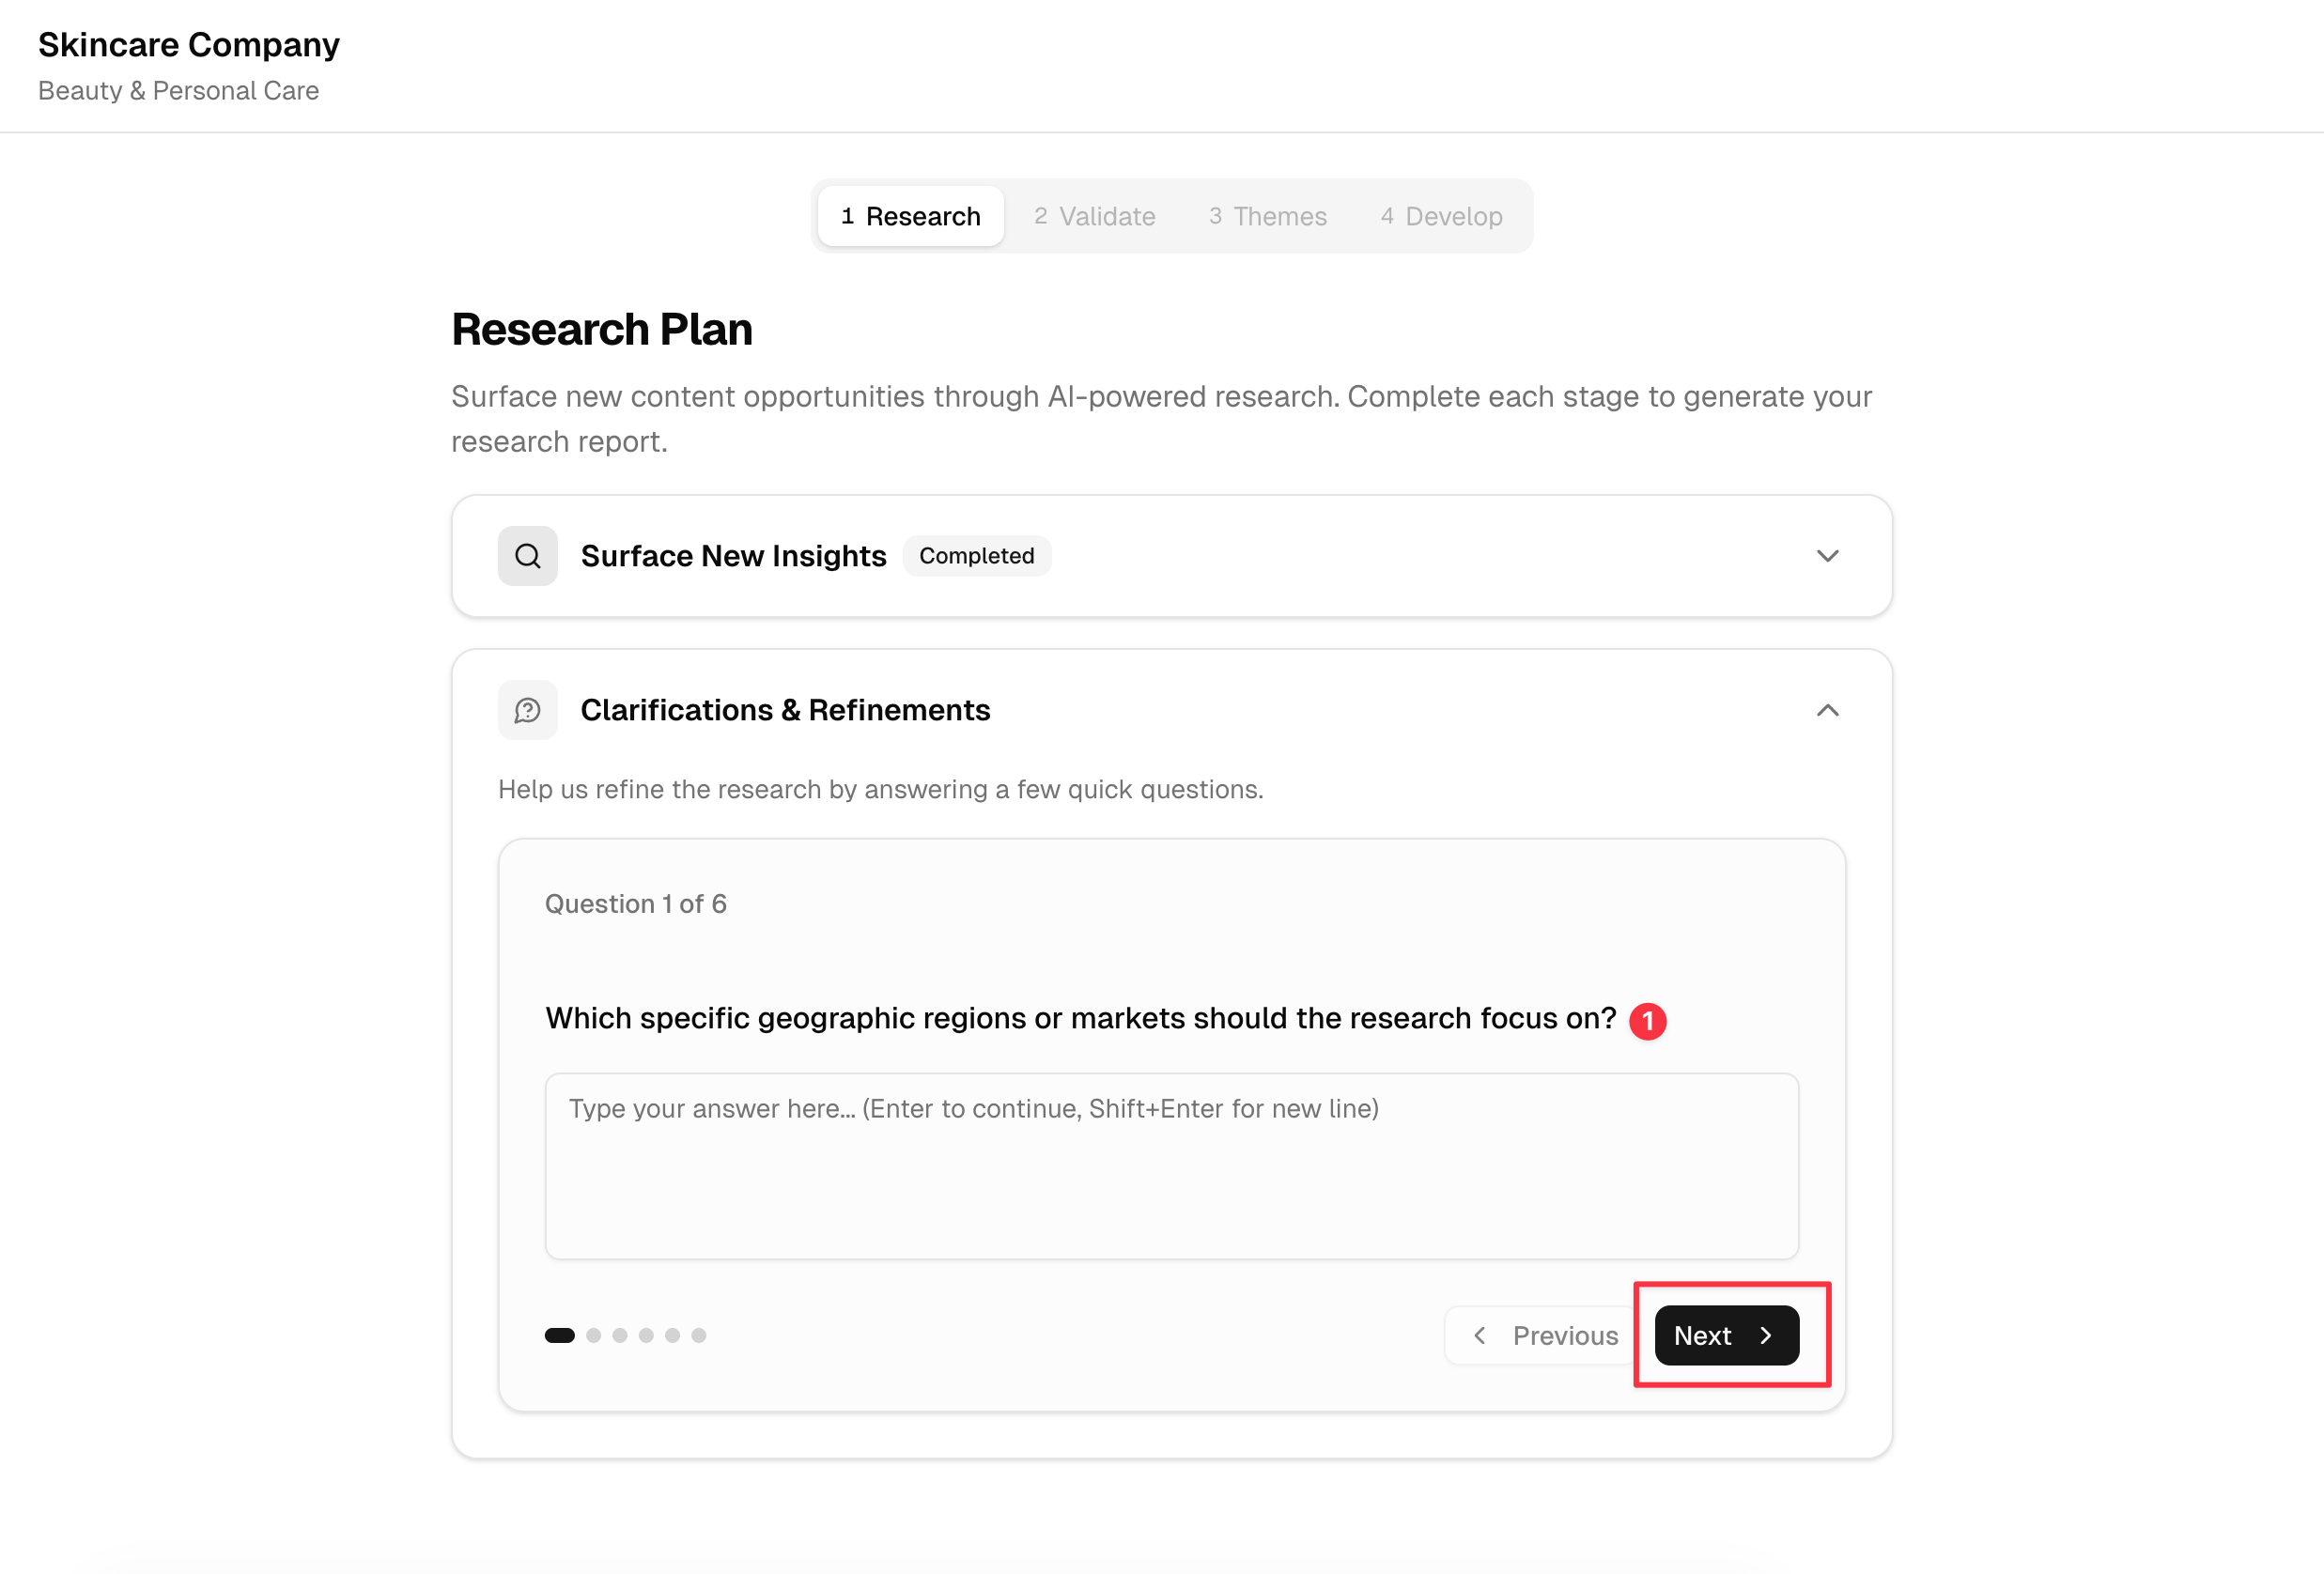
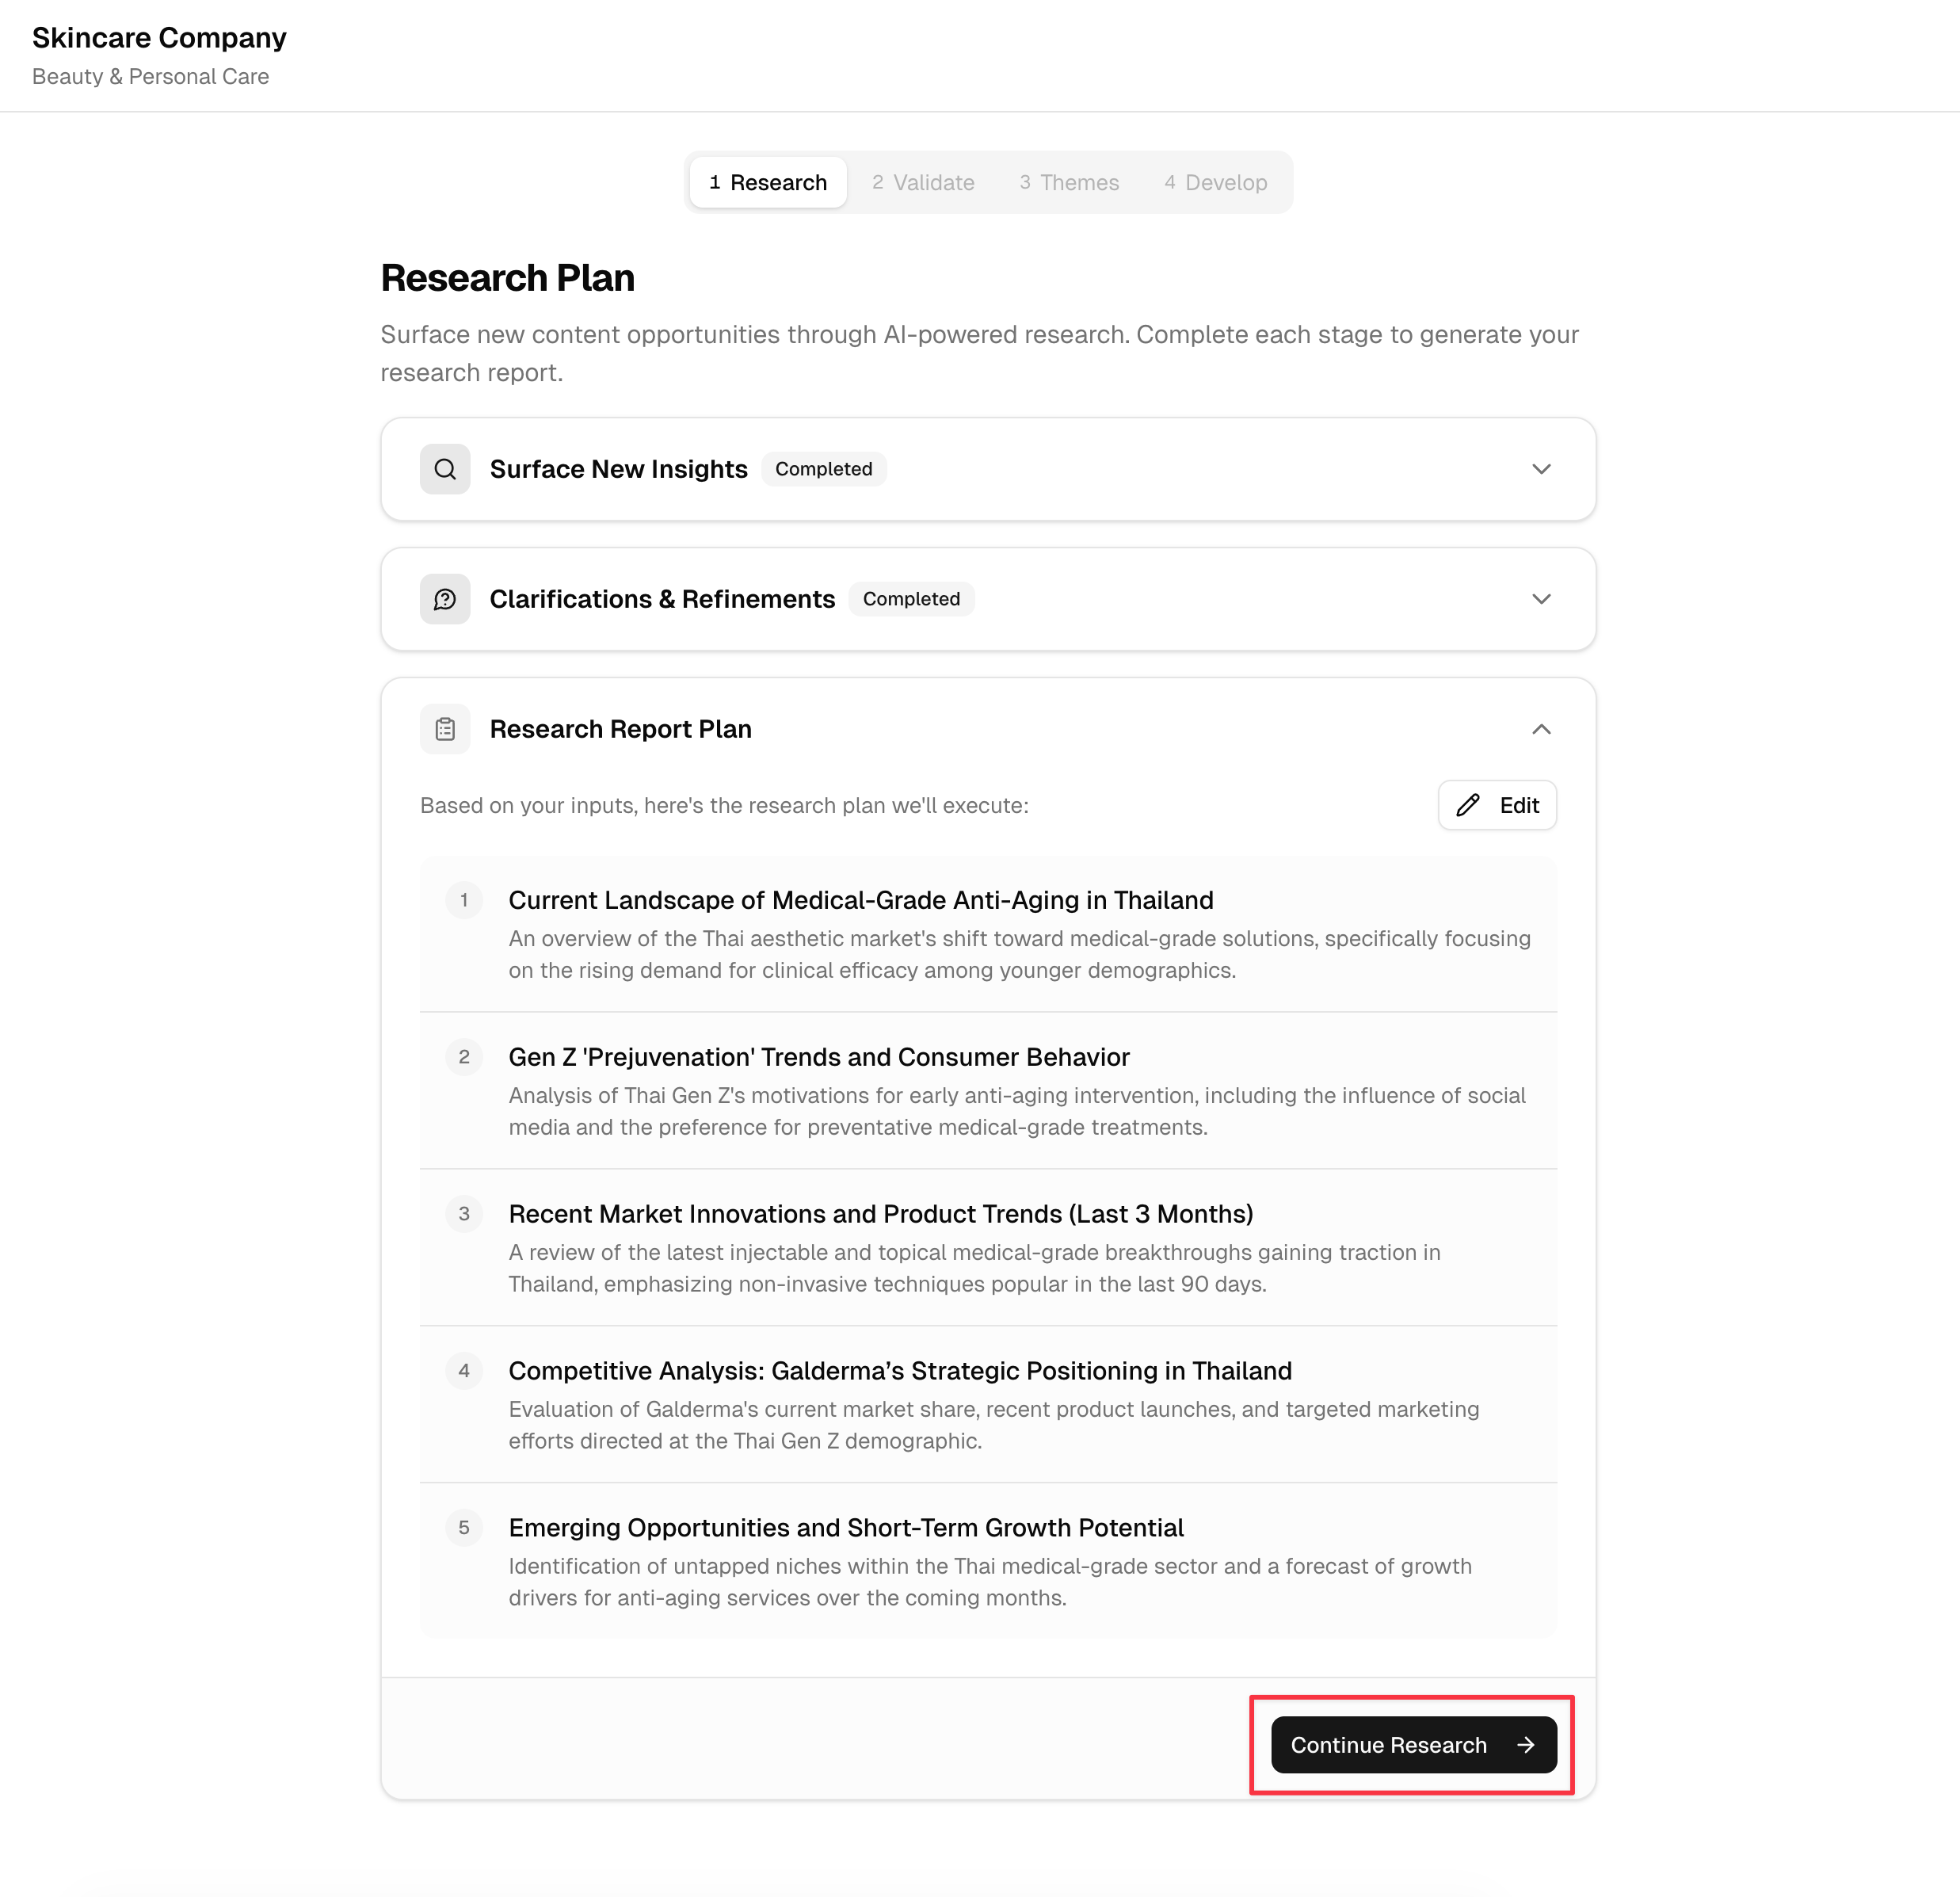
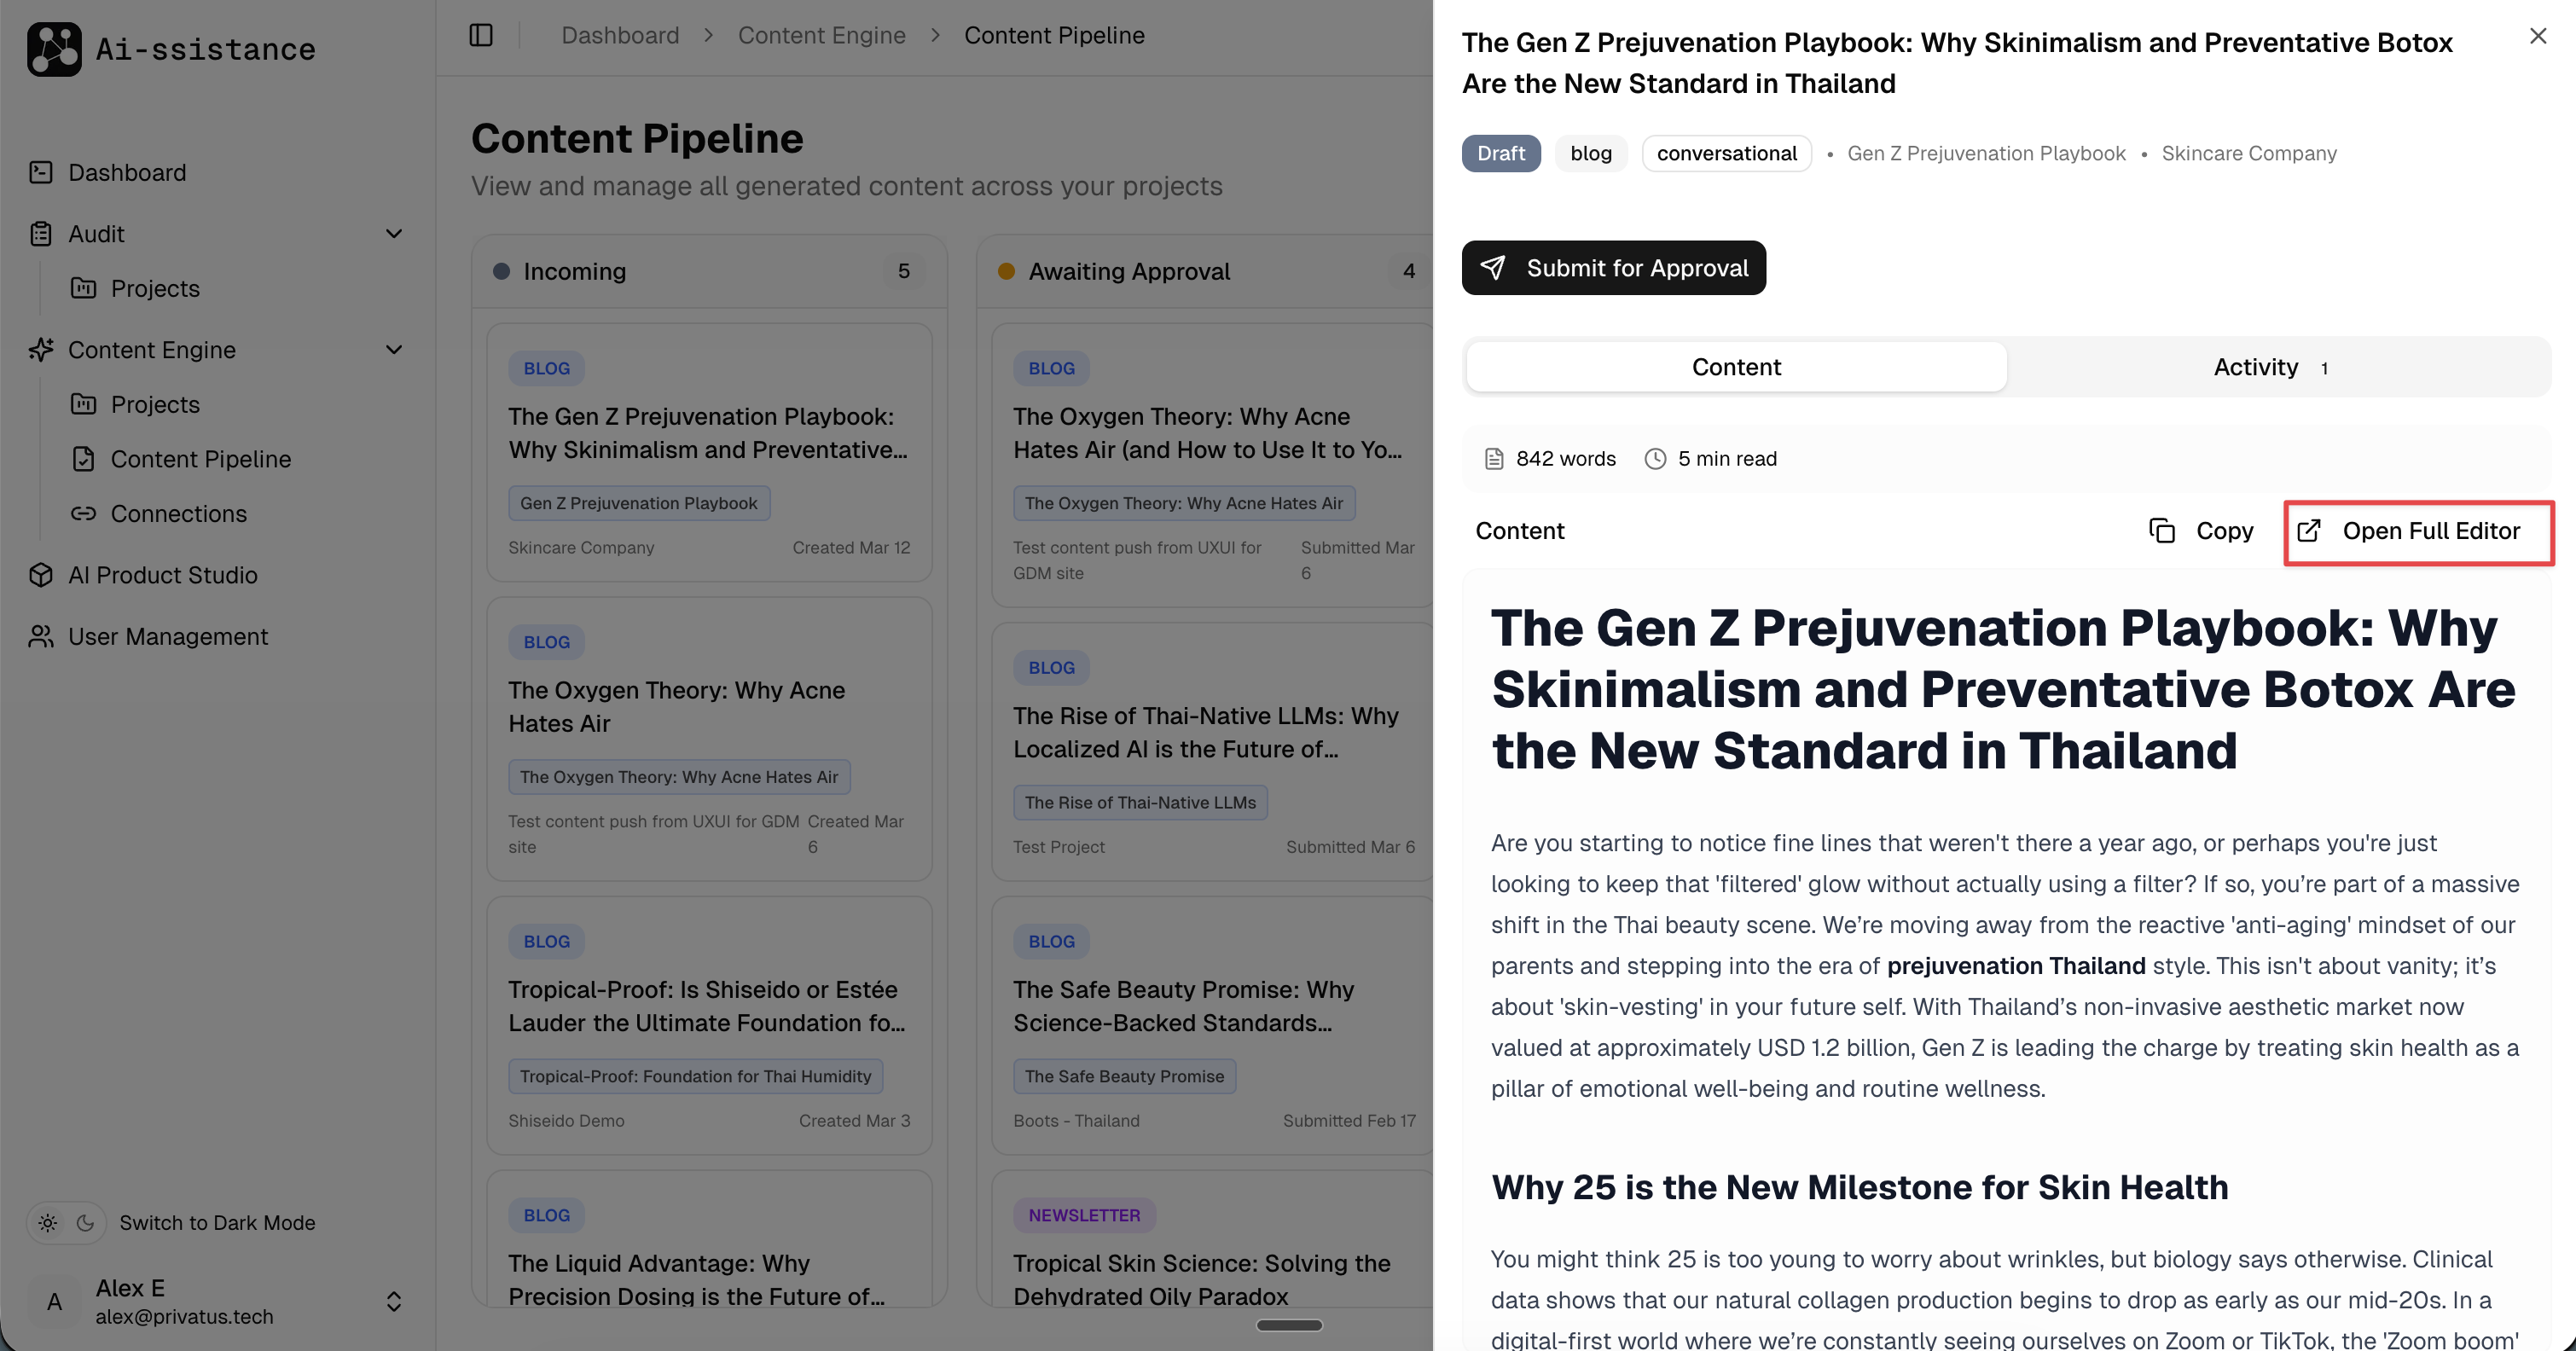
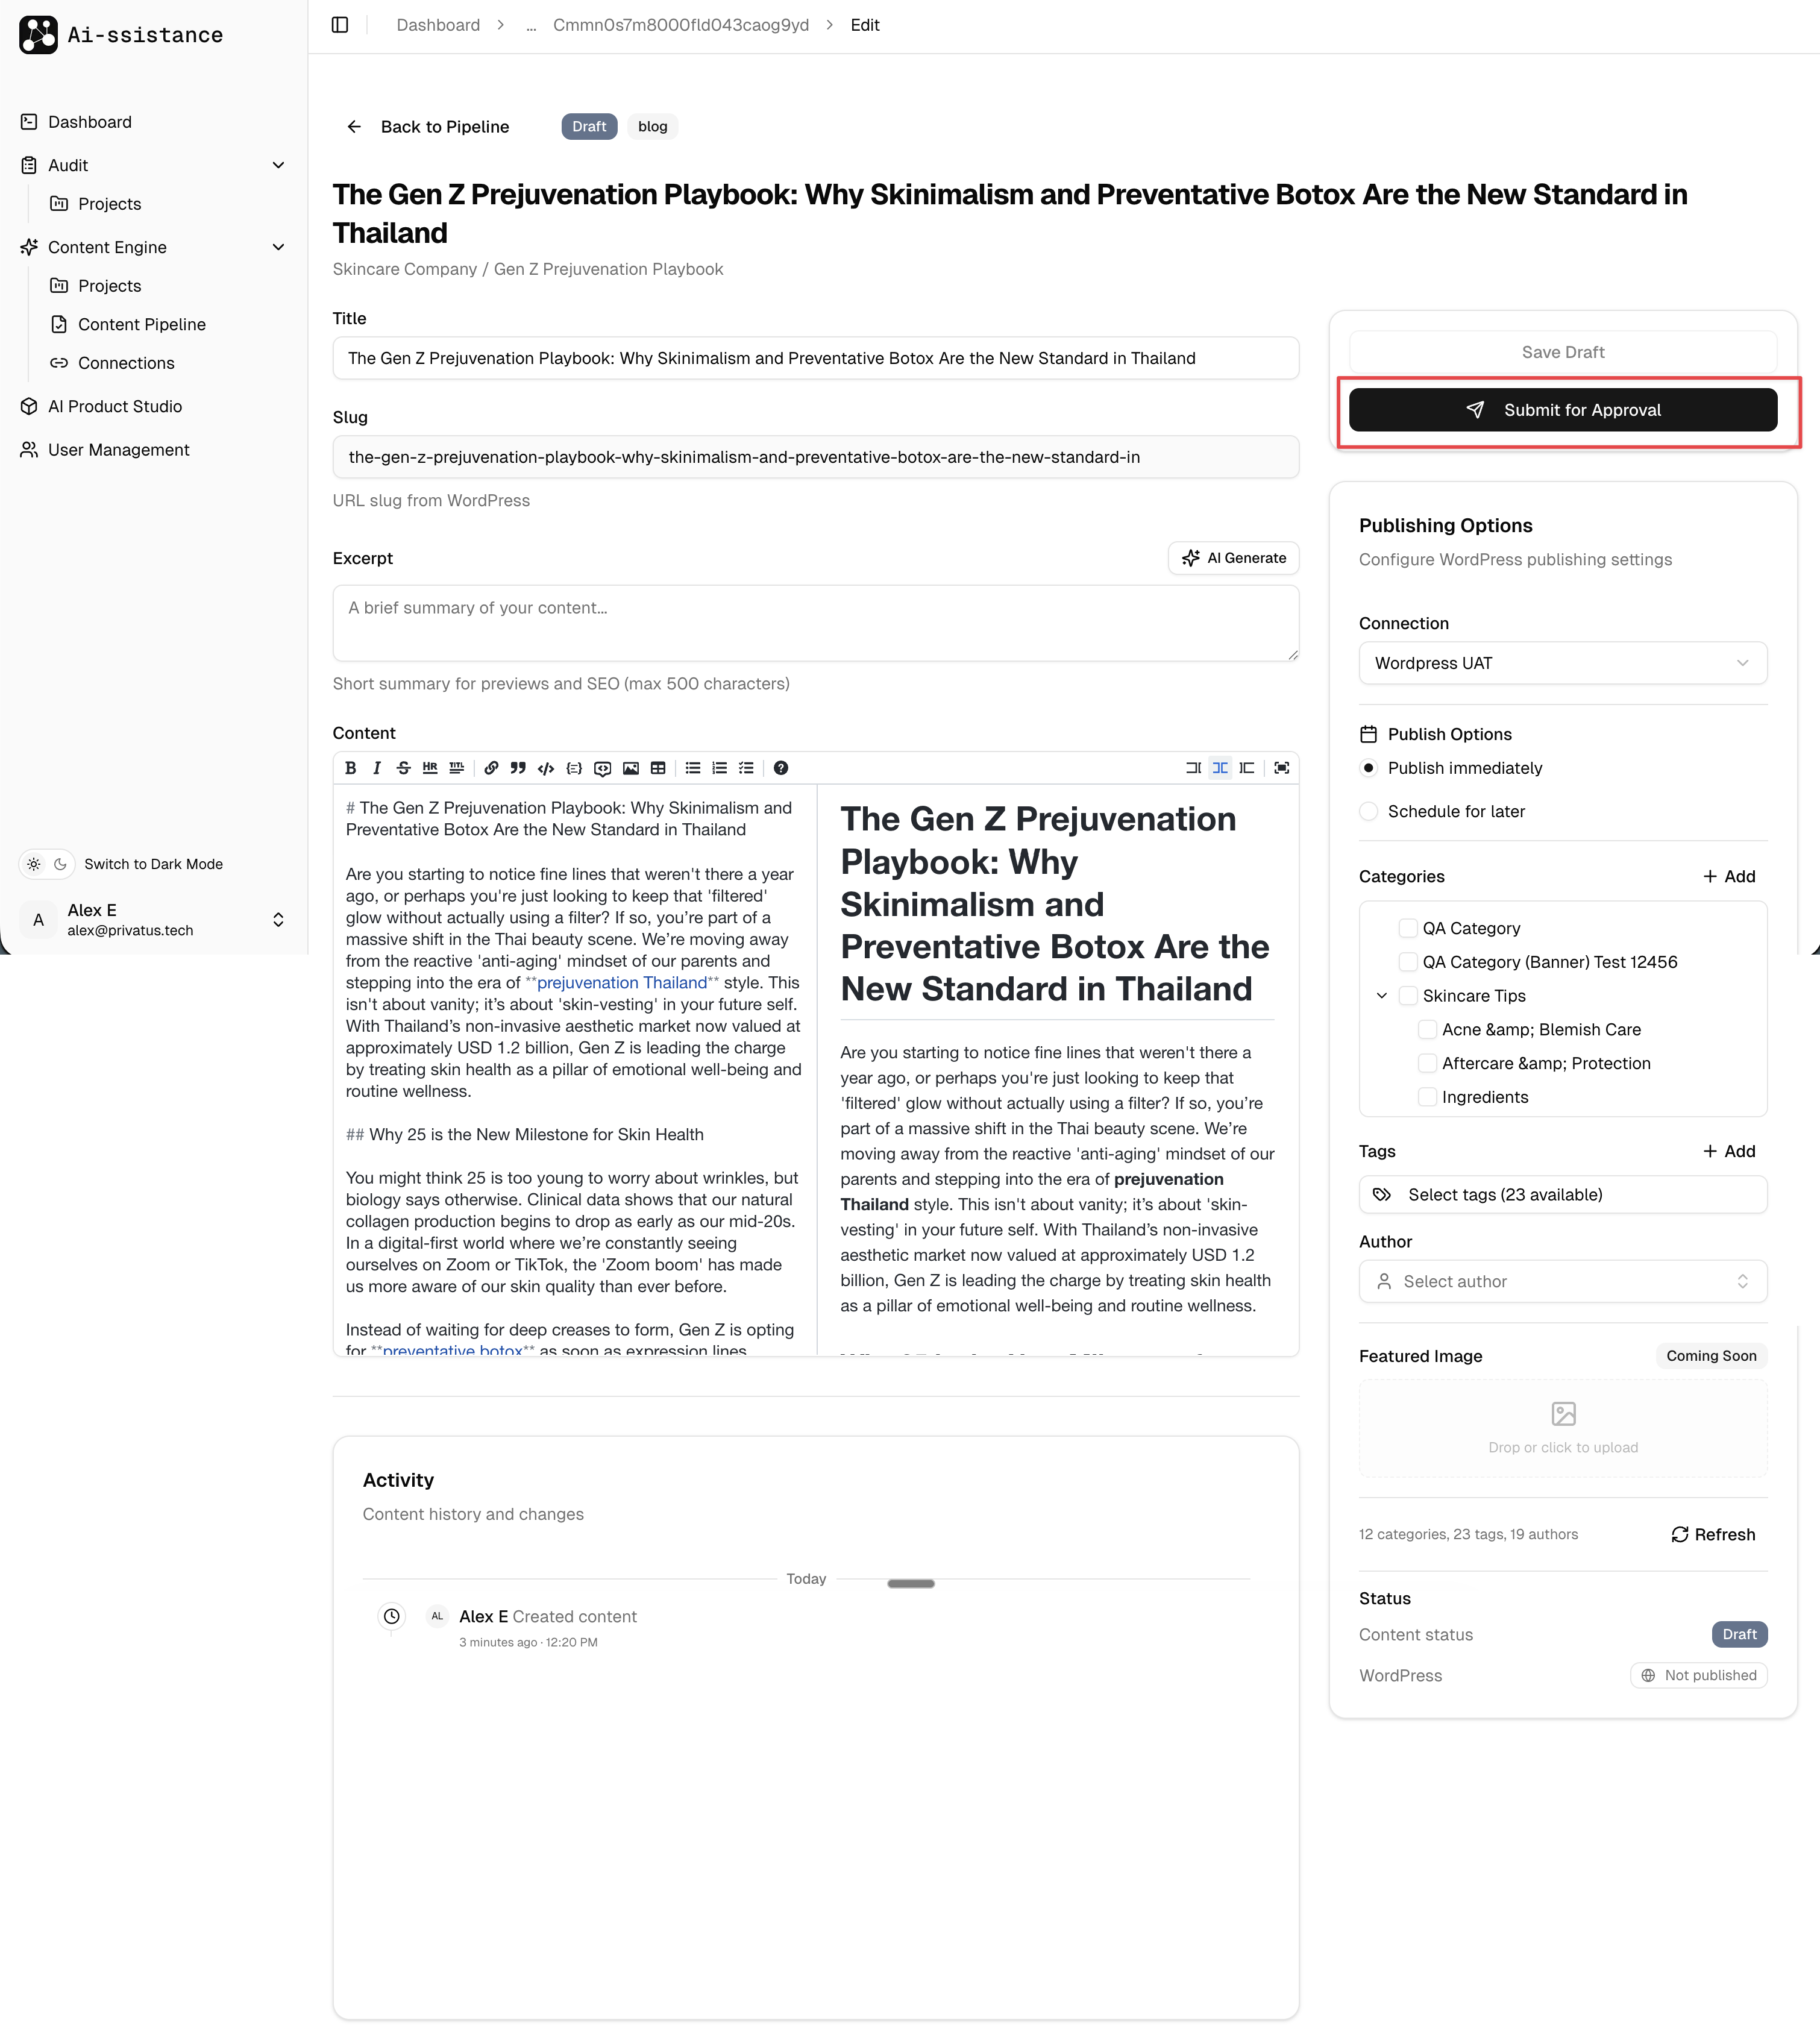
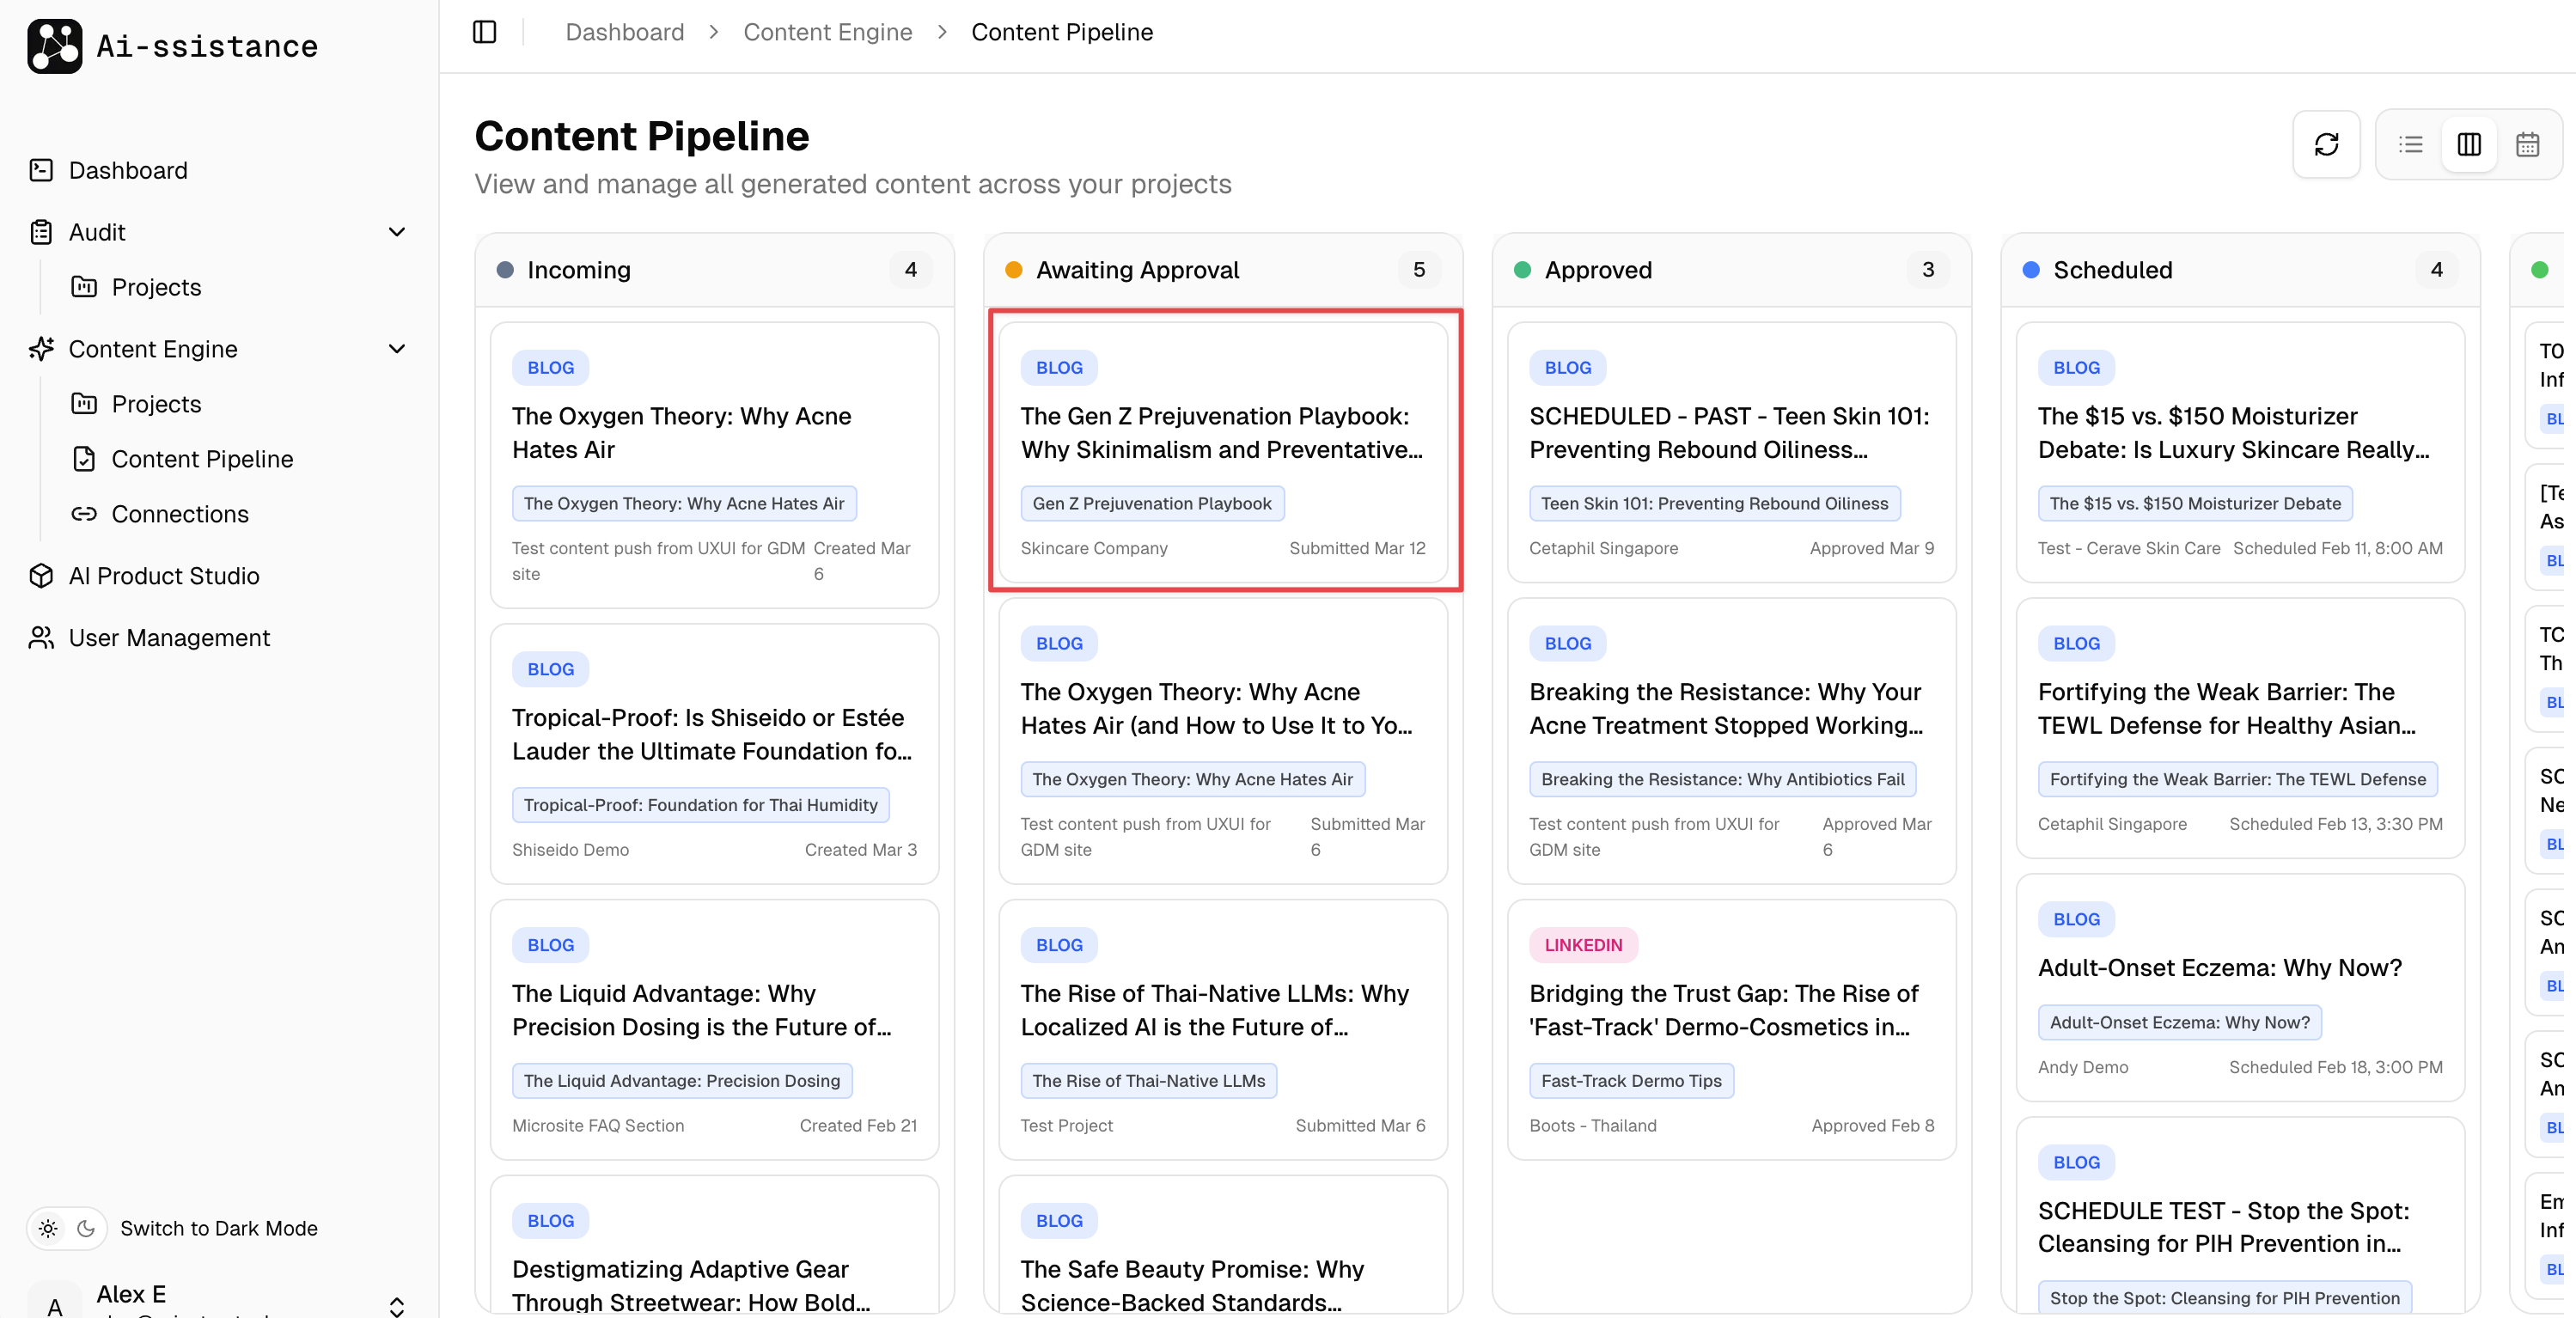
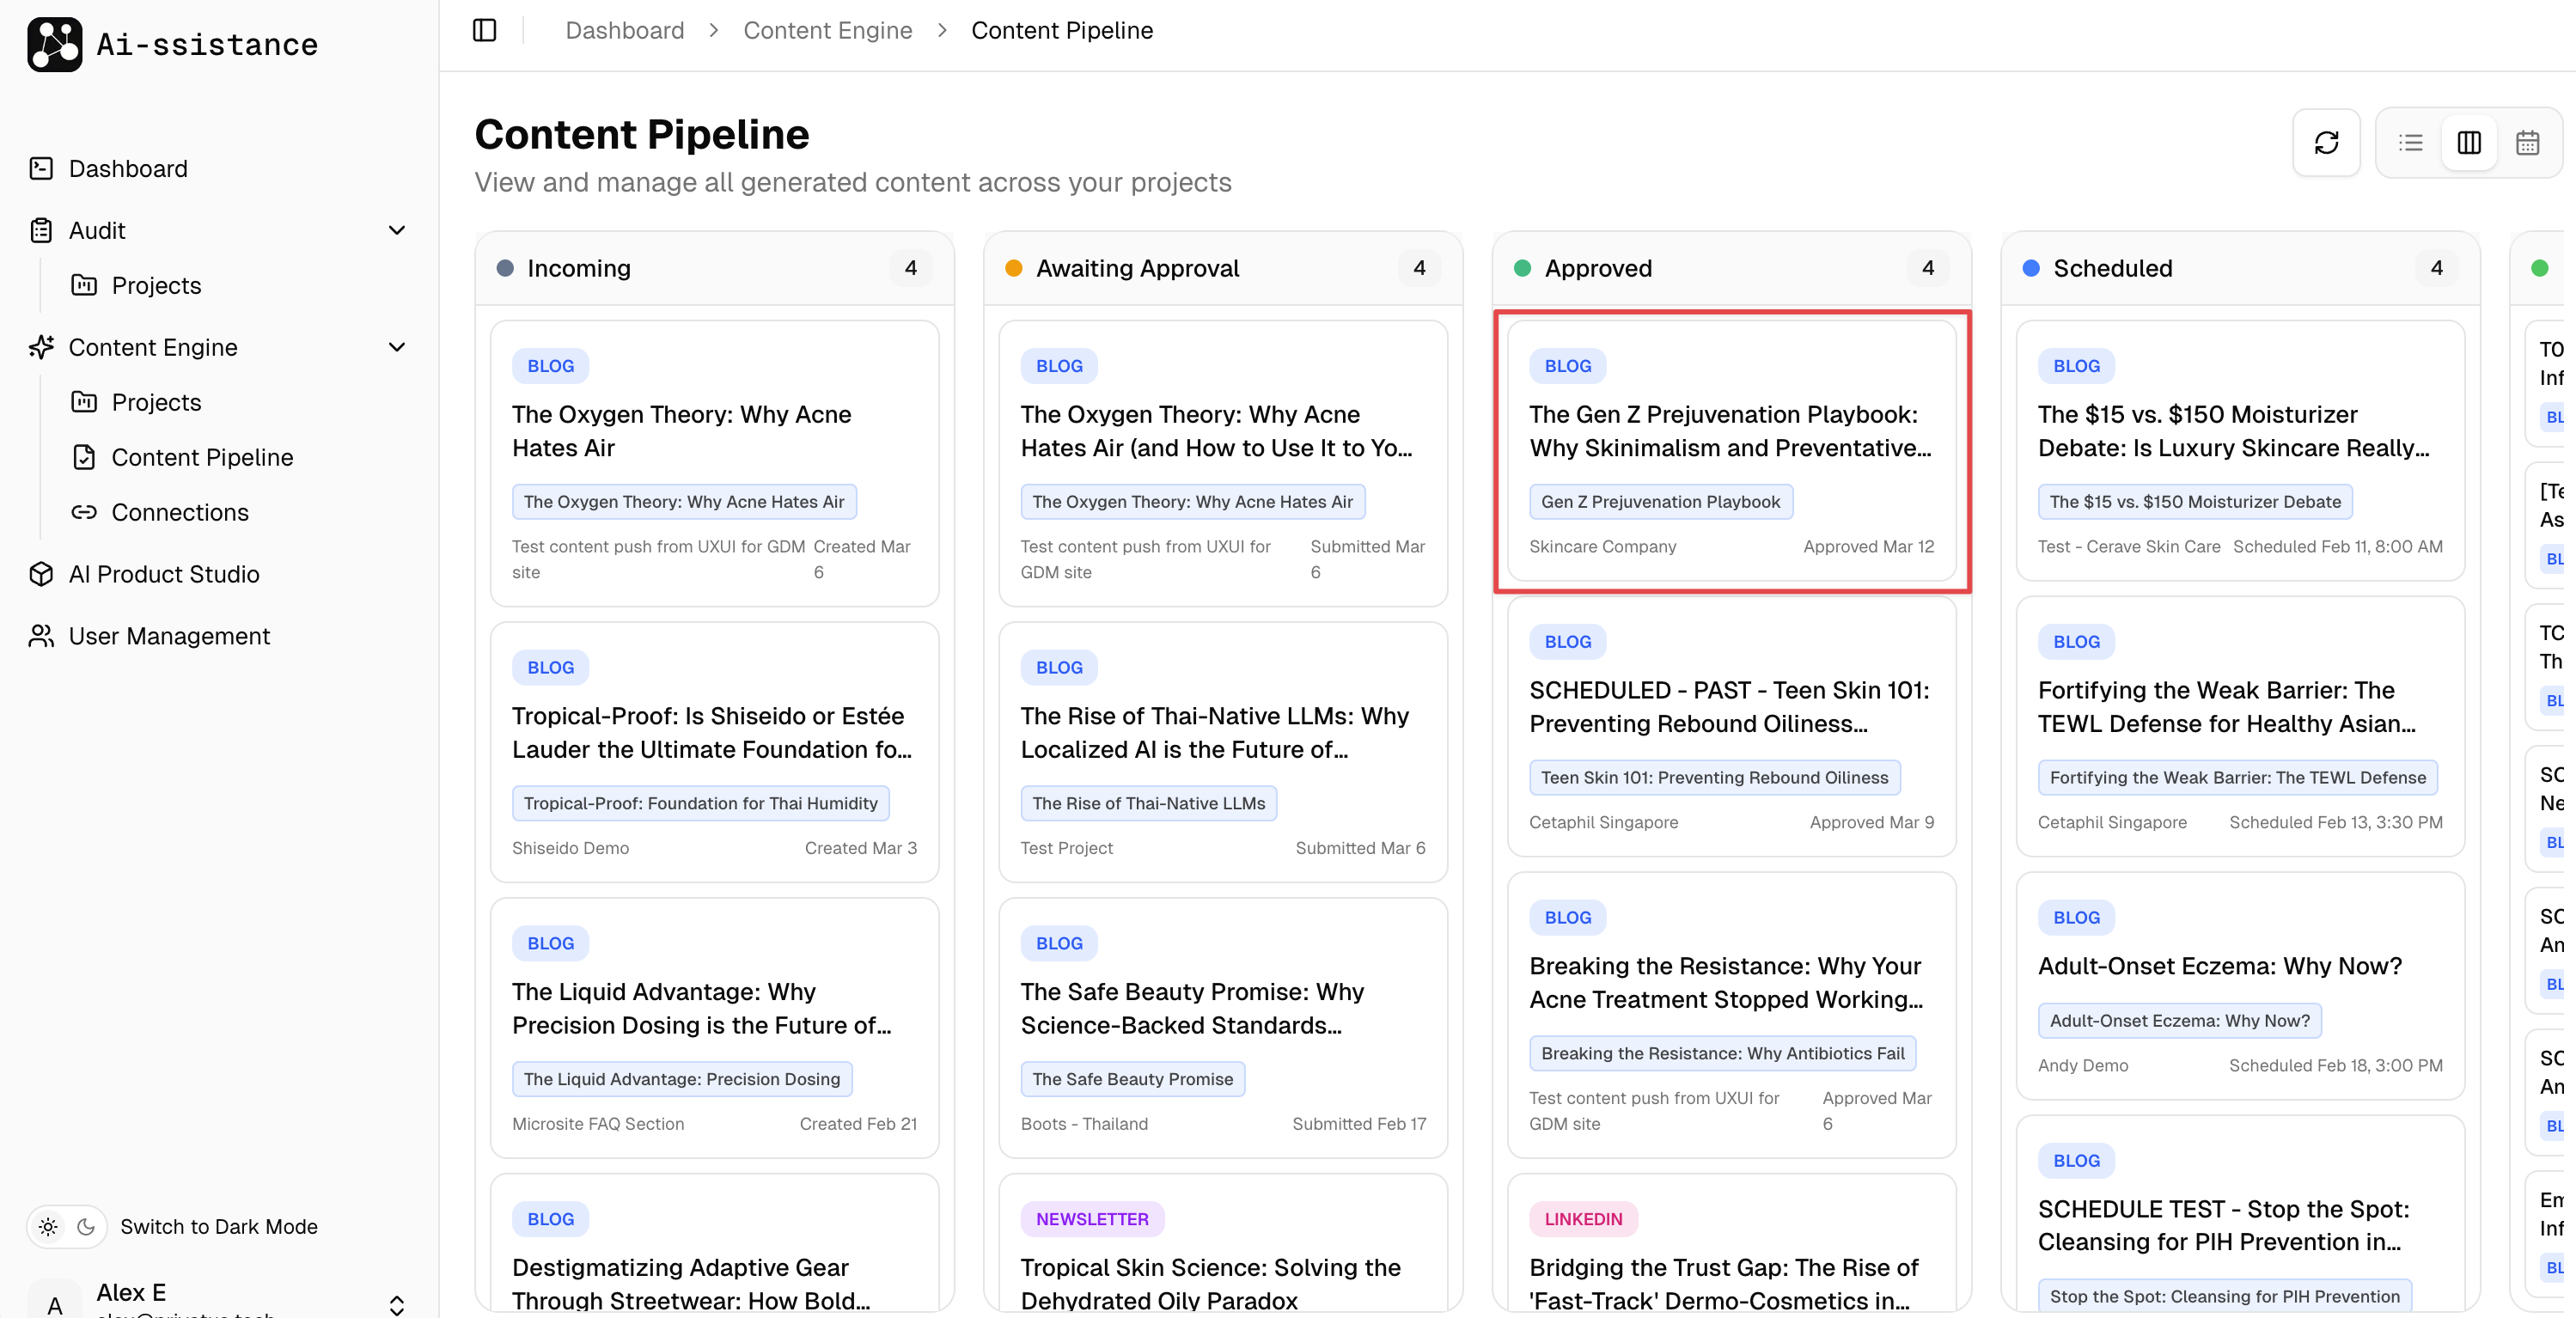
Ai-ssistance

Content Engine

Enterprise content creation powered by AI research

A step-by-step guide

01

Create Your Project

Set up a new content engine project with your brand details

Ai-ssistance
Content Engine Projects page with New Project button highlighted
Step 1

Open Content Engine Projects

  • In the left sidebar, expand Content Engine and click Projects
  • You'll see a list of all existing projects with their status, themes, and content counts
  • Click the "+ New Project" button (top right, highlighted) to create a new project
Ai-ssistance
New Content Engine Project form with numbered fields
Step 2

Enter Project Details

  • 1) Project Name — enter your brand or campaign name (e.g. "Skincare Company")
  • 2) Industry/Category — select from the dropdown to help the AI target relevant research
  • 3) Default Connection (optional) — link a CMS like WordPress to publish directly
Ai-ssistance
Completed project form with Create Project button highlighted
Step 3

Create the Project

  • Verify all your project details are filled in correctly
  • Click the "Create Project" button (top right, highlighted) to save and continue
  • You'll be taken to the Research Plan where AI-powered content creation begins
Ai-ssistance
02

Plan Your Research

Define your content focus and let AI surface new insights

Ai-ssistance
Research Plan page with content topic and context fields
Step 4

Set Your Research Focus

  • Click a Suggested Content Topic (e.g. "Market trends and opportunities") or type your own
  • 1) Content Topic or Focus — describe what you want to create content about, be as specific as possible
  • 2) Additional Context (optional) — add goals, competitors, or specific angles to consider
Ai-ssistance
Filled research form with Start Plan button highlighted
Step 4a

Start the Research Plan

  • Once your topic and context are filled in, the "Surface New Insights" section will show as Completed
  • Click the "Start Plan" button (bottom right, highlighted) to begin AI-powered research
  • The AI will analyze your topic and generate targeted clarification questions
Ai-ssistance
03

Refine & Confirm

Answer clarification questions and confirm the research plan

Ai-ssistance
Clarifications and Refinements with question and Next button
Step 5

Answer Clarifications

  • The AI asks targeted questions to refine your research — type your answer in the text field (1)
  • Use the dot indicators at the bottom to track your progress through all questions
  • Click "Next" (bottom right, highlighted) to proceed, or "Previous" to go back
Ai-ssistance
Research Report Plan with 5 items and Continue Research button
Step 6

Confirm the Research Plan

  • The AI generates a Research Report Plan with numbered sections, each targeting a specific content angle
  • Click "Edit" (top right of the plan) to modify any section before proceeding
  • Click "Continue Research" (bottom right, highlighted) to execute the research plan
Ai-ssistance
04

Validate Research

Review collected data and optionally add more research

Ai-ssistance
Research Validation with 12 collected items
Step 7

Review Collected Research

  • The AI has gathered multiple research items — click "Show all" to expand the full list
  • Remove items with the X button, or click "Re-run Research" / "+ Add more" for additional data
  • Click "Continue to Report" (highlighted) to generate a report, or "Continue to Themes" to skip ahead
Ai-ssistance
Add more research dialog with text input
Step 7a

Add More Research (Optional)

  • If you clicked "+ Add more", a dialog appears asking what else you'd like to research
  • Type a new research topic in the text field (e.g. "Analyze TikTok trends for skincare")
  • Click "+ Start Research" to add it to your existing research, or "Cancel" to go back
Ai-ssistance
05

Choose Content Themes

Select AI-generated themes scored by content gap, relevance, and uniqueness

Ai-ssistance
Select Content Themes grid with 6 theme cards
Step 8

Browse Content Themes

  • Each card shows a Content Gap score, Relevance, Market Gap, target audience, and competition level
  • Review suggested keywords and formats (e.g. Blog Posts, TikTok Videos, Infographics) for each theme
  • Click on a theme card to select it — you can select up to 5 themes, or click "Regenerate" for new options
Ai-ssistance
3 themes selected in sidebar with Continue to Generation button
Step 9

Confirm Selected Themes

  • Your selected themes appear in the left sidebar with their priority order and content gap tags
  • Drag to reorder theme priority — the first theme will be generated first
  • Click "Continue to Generation" (bottom left, highlighted) to start creating content for your themes
Ai-ssistance
06

Generate Content

Research, configure, and generate SEO-optimized blog posts

Ai-ssistance
Research depth selector with Start Research button
Step 10

Choose Research Depth

  • Select your research depth: Quick (5 sources), Standard (10 sources), or Deep (20 sources)
  • Deeper research takes longer but produces more comprehensive, data-backed content
  • Click "Start Research" (highlighted) to gather insights specific to this blog post
Ai-ssistance
Research results with key insights and content generation options
Step 10a

Review Research & Configure

  • Review the AI research summary with Key Insights, Key Statistics, and cited Sources
  • Configure your content: choose Type (Blog Post, Newsletter, etc.), Tone, Length, and Focus (SEO/Engagement)
  • Click "Generate Blog Post" (bottom, highlighted) to create your content
Ai-ssistance
Generated blog post preview with title and content sections
Step 11

Preview Generated Content

  • Your blog post is ready with a title, structured headings and content, word count, and read time
  • Review the alternative headlines, hashtags, and call to action suggestions below the content
  • Use the "Copy" button to copy the content, or navigate to the pipeline to continue editing
Ai-ssistance
07

Content Pipeline

Track all content through your workflow on a Kanban board

Ai-ssistance
Content Pipeline Kanban board with 5 columns
Step 12

View the Content Pipeline

  • Navigate to Content Pipeline in the sidebar to see the Kanban board
  • Content flows through 5 stages: Incoming → Awaiting Approval → Approved → Scheduled → Published
  • Click on any content card (highlighted) to open the detail panel for editing and review
Ai-ssistance
08

Edit & Review

Fine-tune content and submit for approval

Ai-ssistance
Content preview panel with Open Full Editor button highlighted
Step 13

Preview & Open Editor

  • Clicking a content card opens a side panel with the full content preview, word count, and read time
  • Use "Submit for Approval" directly, or click "Copy" to copy the content
  • Click "Open Full Editor" (highlighted) for detailed editing with SEO and publishing controls
Ai-ssistance
Full content editor with rich text, SEO settings, and Submit for Approval button
Step 14

Edit & Submit for Approval

  • Edit the title, slug, excerpt, and full content using the rich text editor with live preview
  • Configure Publishing Options, Categories, Tags, and WordPress connection on the right panel
  • Click "Submit for Approval" (top right, highlighted) when the content is ready for review
Ai-ssistance
09

Approve & Publish

Move content through approval, then publish or schedule to WordPress

Ai-ssistance
Content Pipeline with post in Awaiting Approval column
Step 15

Awaiting Approval

  • After submission, your content automatically moves to the "Awaiting Approval" column (highlighted)
  • Team members with approval permissions will be notified to review the content
  • You can click the card at any time to check its status or make further edits
Ai-ssistance
Content Pipeline with post moved to Approved column
Step 16

Content Approved

  • Once a team member approves the content, it automatically moves to the "Approved" column (highlighted)
  • Approved content is ready to be published immediately or scheduled for a future date
  • Click the content card to open the publishing options
Ai-ssistance
Publish to WordPress dialog with publish immediately or schedule options
Step 17

Publish or Schedule

  • A "Publish to WordPress" dialog appears with two options
  • Select "Publish immediately" to go live now, or "Schedule for later" to set a future date
  • Click "Publish Now" to publish right away, or continue to the scheduling step
Ai-ssistance
Schedule dialog with date picker and Schedule button highlighted
Step 18

Set Schedule Date & Time

  • Select "Schedule for later" and pick your preferred date and time using the pickers
  • The time is set in your local timezone — the post will go live automatically at that time
  • Click the "Schedule" button (highlighted) to confirm and queue the post
Ai-ssistance
Content Pipeline with post in Scheduled column
Step 19

Content Scheduled

  • Your content moves to the "Scheduled" column in the pipeline (highlighted)
  • The card shows the scheduled publish date — it will go live automatically at the set time
  • You can click the card to view details, unschedule, or sync changes to WordPress
Ai-ssistance
10

Monitor & Track

View scheduled posts, activity logs, calendar, and live content

Ai-ssistance
Scheduled post detail panel with Sync to WordPress and Unschedule options
Step 20

View Scheduled Post Details

  • Click a scheduled post to open the detail panel with the "Scheduled" badge and publish time
  • Use "Sync to WordPress" to push any edits, or "Unschedule" to cancel the scheduled publish
  • Click "Preview on WordPress", "Edit in WordPress", or "Open Full Editor" for further changes
Ai-ssistance
Activity log showing creation, approval, and scheduling events
Step 21

Track Activity History

  • Switch to the "Activity" tab to see a complete audit trail for each content piece
  • Every action is logged: created, submitted for approval, approved, slug updated, scheduled
  • Each entry shows who performed the action and when, with precise timestamps
Ai-ssistance
Content Pipeline calendar view showing scheduled posts on dates
Step 22

Calendar View

  • Use the view toggle (top right of the pipeline) to switch to the calendar view
  • See all scheduled and published content laid out across the month at a glance
  • Click any entry (highlighted) to view its details, or use the arrows to navigate between months
Ai-ssistance
Published blog post live on website
Step 23

Content Published

  • Your content is now live on your website — fully researched, SEO-optimized, and published on schedule
  • The blog post includes structured headings, internal links, and keyword-rich content for maximum visibility
  • Head back to the Content Pipeline to monitor performance and start planning your next piece
Ai-ssistance
Ai-ssistance

Start Creating Content

AI assistance that actually assists.

ai-ssistance.com